☞ 문서의 내용은 가장 하단 참고문헌 및 사이트를 참고하여 필자가 보기 쉽도록 정리한 내용입니다.
☞ 틀린 내용 및 저작권 관련 문의가 있는 경우 문의하시면 수정 및 삭제 조치하겠습니다.
많은 CNN 분류 모델들 중 하나로 VGGNet은 옥스퍼드 대학에서 개발됐으며 2014년 ImageNet Challenge에서 정확도 92.7%를 달성하며 준우승 한 모델이다. VGGNet의 논문 이름은 Very Deep Convolutional Networks for Large-Scale Image Recognition 이다. VGGNet은 신경망 모델의 깊이(layer)에 따라 VGG16, VGG19로 불린다. 아래 그림을 보면 VGGNet을 시작으로 네트워크의 깊이가 확 싶어 지는 것을 확인할 수 있다. VGGNet은 사용하기 쉬운 구조와 좋은 성능 때문에 GoogleNet보다 많이 사용된다.

VGGNet의 구조
VGGNet 연구의 핵심은 네트워크의 깊이가 성능에 어떤 영향을 미치는지를 확인하고자 했다. VGGNet은 합성곱 레이어에서 3x3 필터를 사용하여 기존의 연구되었던 AlexNet(8layers)모델보다 2배 이상 깊은 네트워크 학습에 성공했으며, 오차율을 절반(16.4 > 7.3)으로 줄였다. VGG연구팀은 총 6개의 구조(A, A-LRN, B, C, D(VGG16), E(VGG19))를 만들어 성능을 비교했으며 깊이가 깊어질수록 분류 에러가 감소하는 것을 확인했다. 여기서 conv3는 3x3필터를, conv1은 1x1 필터를 의미한다. 또한 conv3-N에서 N은 필터의 개수에 해당한다. 예를 들어 conv3-64는 3x3필터를 학습 매개변수로 사용했다는 의미이다.

VGG-16 Architecture의 구성은 아래 그림과 같다. input으로 224x224x3 이미지를 입력받는다. 13개의 Convolution Layer를 가지며 Stride와 padding은 1이다. Convolution filters는 위에서 설명한 대로 3x3 filter이다. 활성화 함수는 ReLU를 사용했다. max pooling은 2x2(stride : 2)이다. 3개의 Fully-connected Layer를 가진다. 3 Fully-Connected Layer는 각각 4096, 4096, 1000개의 유닛으로 구성돼 있으며, 출력층(1000: class의 수)은 classification을 위한 Softmax함수를 사용한다.

6개의 구조 중 D에 해당하는 VGG16을 예로 들면, 아래 사진과 같이 정리할 수 있다. Batch Normalization이 포함된 버전이 주로 활용된다.


3 X 3 Filters
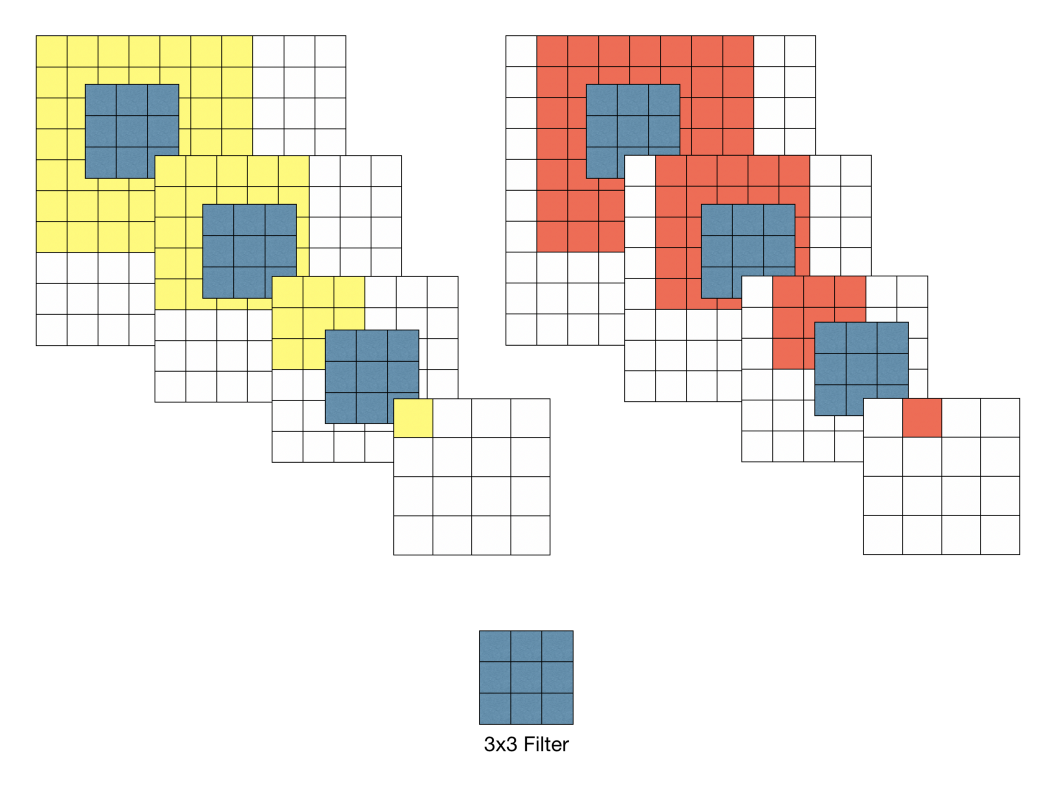
VGG 모델 이전에 CNN은 비교적 큰 Receptive Field를 갖는 11 x 11 필터나 7x7필터를 포함했다. 그러나 VGG 모델은 오직 3x3 필터를 사용했음에도 이미지 분류 정확도를 비약적으로 개선시켰다. 이 부분에서 다음과 같은 특성이 있는 것을 발견할 수 있다.

예를 들어 위 그림과 같이 10 x 10 이미지가 있다고 할 때 이 이미지에 대해 7 x 7 필터와 3 x 3필터로 각각 Convolution 수행하면 다음과 같은 특성이 있다.


7 X 7 필터를 이용하여 Convolution했을 경우 출력 특징 맵의 각 픽셀 당 Receptive field는 7 x 7 이다. 3 X 3 필터를 이용하여 Convoltuion을 반복 했을 때 원본 이미지의 7 X 7 영역을 수용할 수 있기 때문에 3차례의 3 x 3 Conv 필터링을 반복한 특징맵은 한 픽셀이 원본 이미지의 7x7 receptive field의 효과를 볼 수 있다. 3 x 3 Conv 필터링을 사용하면 다음과 같은 효과를 볼 수 있다. 첫 번째로 결정 함수의 비선형성이 증가한다. 각 Convolution 연산은 ReLu함수를 포함한다(7x7 필터링의 경우 비선형 함수가 한번만 적용되지만 3x3필터링은 세번의 비선형 함수가 적용된다). 따라서 레이어가 증가함에 따라 비선형성이 증가하게 되고 이것은 모델의 특징 식별성 증가로 이어진다. 두 번째로 학습 파라미터 수의 감소이다. CNN 구조를 학습 할 때, 학습 대상인 가중치(weight)는 필터의 크기에 해당한다. 따라서 7 x 7 필터 1개에 대한 학습 파라미터 수는 49이고 3 x 3 필터 3개에 대한 학습 파라미터 수는 27(3x3x3)이 된다. 물론 위와 같은 특징이 모든 경우 좋은 것은 아니다. 다시 말해서 네트워크의 깊이를 깊게 만드는 것이 장점만 있는 것이 아니다.
학습 이미지 크기
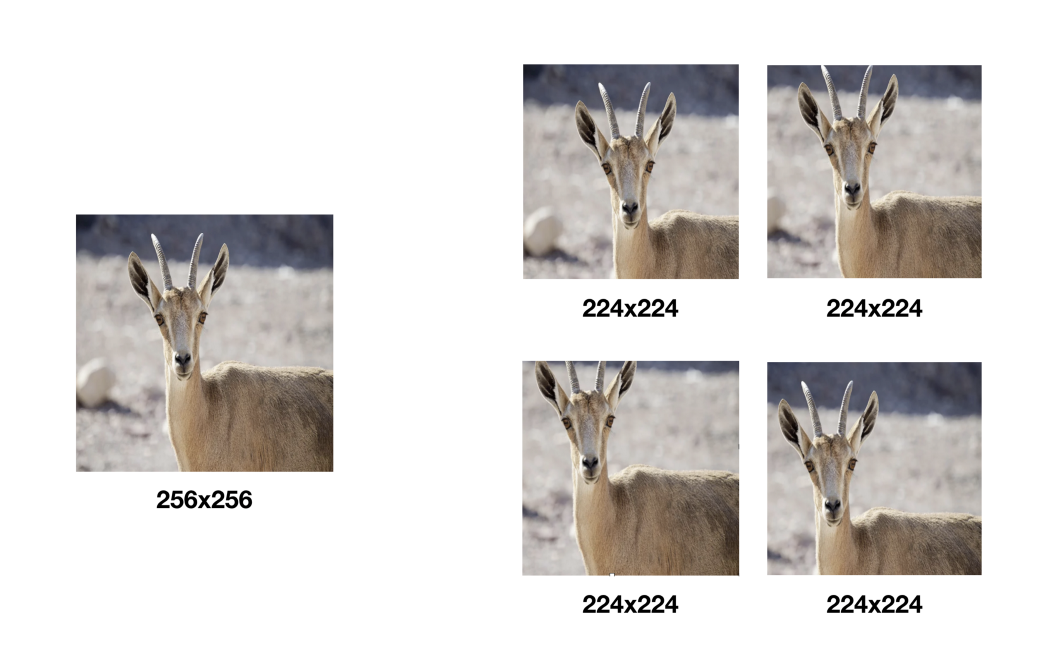
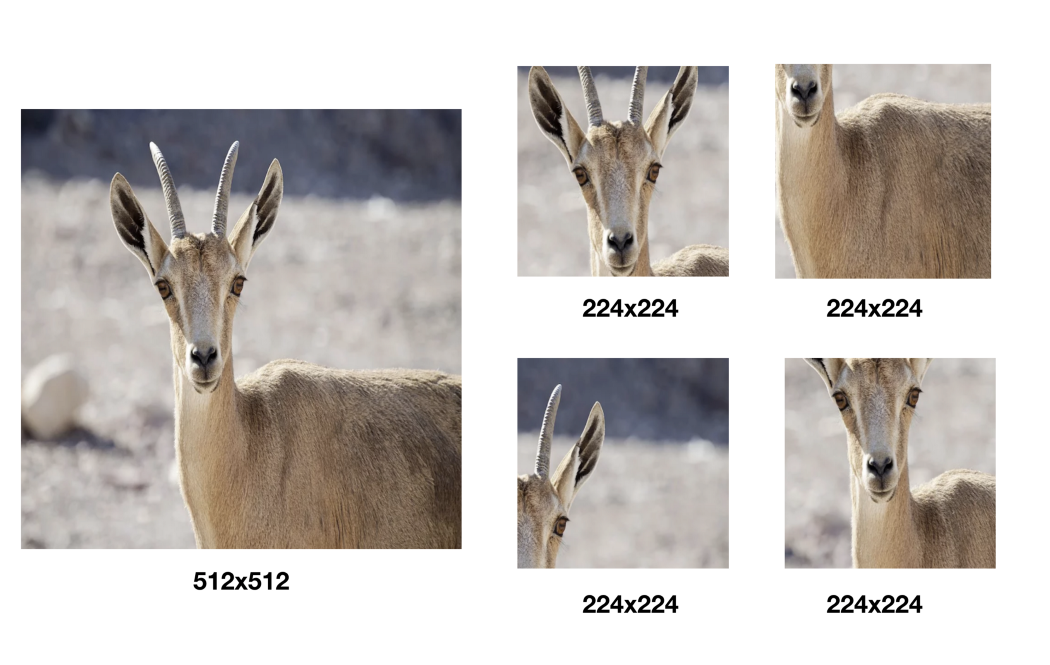
VGG는 Training 입력 이미지 크기를 224 x 224로 고정했다. 학습 이미지는 각 이미지에 대해 256 x 256 ~ 512 x 512내에서 임의의 크기로 변환하고, 크기가 변환된 이미지에서 개체(Object)의 일부가 포함된 224 x 224 이미지를 Crop하여 사용 했다.


이 처럼 학습 데이터를 다양한 크기로 변환하고 그 중 일부분을 샘플링하여 사용함으로써 몇 가지 효과를 얻을 수 있다. 첫 번째로 한정적인 데이터의 수를 늘릴 수 있다(Data augmentation). 두 번째로 하나의 오브젝트에 대한 다양한 측면을 학습시 반영시킬 수 있다. 변환된 이미지가 작을 수록 개체의 전체적인 측변을 학습할 수 있고, 변환된 이미지가 클수록 개체의 특정한 부분을 학습에 반영할 수 있다. 세 번째로 Overfitting을 방지하는데 도움을 준다. 실제로 VGG 연구팀의 실험 결과에 따르면 샘플링하여 학습 데이터로 사용한 경우가 단일 스케일 이미지에서 샘플링한 경우보다 분류 정확도가 좋았다.
Fully-convolutional Nets
Training 완료된 모델을 테스팅할 때는 신경망의 마지막 3 Fully-Connected layers를 Convolutional layers로 변환하여 사용한다. 첫 번째 Fully-Connected layer는 7x7 Conv로, 마지막 두 Fully-Connected layer는 1x1 Conv로 변환하였다. 이런식으로 변환된 신경망을 Fully-Convolutional Networks라 부른다. 신경망이 Convolution layer로만 구성될 경우 입력 이미지의 크기 제약이 없어진다. 이에 따라 하나의 입력 이미지를 다양한 스케일로 사용한 결과들을 앙상블하여 이미지 분류 정확도를 개선하는 것도 가능해진다.
VGGNet으로 ImageNet학습하기
Data 준비하기
학습할 ImageNet dataset을 다운로드 받아야 한다. 링크를 눌러 2012년도 dataset을 다운로드 받는다. 기존 이미지넷에서 지원하는 링크는 다운로드 받을 수없기 때문에 토렌트를 이용해서 다운로드 받아야 한다. 총 용량은 150GB 정도로 필자의 경우 하루 정도 걸려서 다운로드 받았다. pytorch에서 ImageNet dataset 압축을 풀기 위해서는ILSVRC2012_devkit_t12.tar.gz 파일이 필요하다. 해당 파일은 링크를 통해서 다운로드 받을 수 있다.
import torch
import torchvision
import torchvision.transforms as transforms

transform = transforms.Compose([
    transforms.Resize((224, 224)),
    transforms.ToTensor(),
    transforms.Normalize((0.5, 0.5, 0.5), (0.5, 0.5, 0.5)),
])


trainset = torchvision.datasets.ImageNet(
    root='./data/imagenet',
    split='train',
    download=None,
    transform=transform
)
trainloader = torch.utils.data.DataLoader(trainset, batch_size=64, shuffle=True)

testset = torchvision.datasets.ImageNet(
    root='./data/imagenet',
    split='val',
    download=None,
    transform=transform
)
testloader = torch.utils.data.DataLoader(testset, batch_size=64, shuffle=False)
pytorch에서는 torchvision이라는 라이브러리에서 쉬운 사용을 위한 방법을 제공한다. trainset과 testset을 나눠서 torchvision.datasets.imageNet으로 data를 load해준다. torchbision.datasets.원하는 데이터 셋 이름으로 함수를 가져올 수 있도록 구성되어 있다.
transform = transforms.Compose([
      transforms.Resize(224),
      transforms.ToTensor(),
      transforms.Normalize((0.5, 0.5, 0.5), (0.5, 0.5, 0.5))
])
윗 부분은 데이터셋을 가져올 때, 형태를 변환해주는 코드로 ToTensor의 위치에 따라, Resize와 Normalizae의 순서는 입력한 순서와 같아야 한다. transforms.Resize(224)는 이미지의 크기를 224x224로 변환하는 코드이다. (VGG Net에서 대상으로 하는 이미지의 크기가 244x244 이기 때문에 224로 변환한다.) transforms.ToTensor()는 받아오는 데이터를 pytorch에서 사용하기 위한 Tensor 자료 구조로 변환하는 코드이다. ransforms.Normalize((0.5, 0.5, 0.5), (0.5, 0.5, 0.5))는 받아오는 데이터를 노말라이징해주는 코드이다.(노말라이징을 하는 경우, 특정 부분이 너무 밝거나 어둡다거나 해서 데이터가 튀는 현상을 막아준다.)
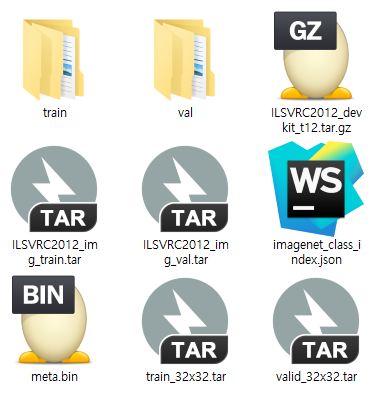
코드를 실행하면 아래 그림과 같이 train폴더와 val폴더로 분리되어 생성된다. 각 폴더 안에는 데이터셋의 각 Class가 폴더로 구성되어 있고, 각 Class폴더 안에는 그 class의 image 파일들이 있다.


VGG 모델 구현하기
class Net(nn.Module):
    def __init__(self):
        super(Net, self).__init__()
        self.conv = nn.Sequential(
            #3 224 128
            nn.Conv2d(3, 64, 3, padding=1),nn.LeakyReLU(0.2),
            nn.Conv2d(64, 64, 3, padding=1),nn.LeakyReLU(0.2),
            nn.MaxPool2d(2, 2),
            #64 112 64
            nn.Conv2d(64, 128, 3, padding=1),nn.LeakyReLU(0.2),
            nn.Conv2d(128, 128, 3, padding=1),nn.LeakyReLU(0.2),
            nn.MaxPool2d(2, 2),
            #128 56 32
            nn.Conv2d(128, 256, 3, padding=1),nn.LeakyReLU(0.2),
            nn.Conv2d(256, 256, 3, padding=1),nn.LeakyReLU(0.2),
            nn.Conv2d(256, 256, 3, padding=1),nn.LeakyReLU(0.2),
            nn.MaxPool2d(2, 2),
            #256 28 16
            nn.Conv2d(256, 512, 3, padding=1),nn.LeakyReLU(0.2),
            nn.Conv2d(512, 512, 3, padding=1),nn.LeakyReLU(0.2),
            nn.Conv2d(512, 512, 3, padding=1),nn.LeakyReLU(0.2),
            nn.MaxPool2d(2, 2),
            #512 14 8
            nn.Conv2d(512, 512, 3, padding=1),nn.LeakyReLU(0.2),
            nn.Conv2d(512, 512, 3, padding=1),nn.LeakyReLU(0.2),
            nn.Conv2d(512, 512, 3, padding=1),nn.LeakyReLU(0.2),
            nn.MaxPool2d(2, 2)
        )
        #512 7 4

        self.avg_pool = nn.AvgPool2d(7)
        #512 1 1
        self.classifier = nn.Linear(512, 1000)
        """
        self.fc1 = nn.Linear(512*2*2,4096)
        self.fc2 = nn.Linear(4096,4096)
        self.fc3 = nn.Linear(4096,10)
        """

    def forward(self, x):
        #print(x.size())
        features = self.conv(x)
        #print(features.size())
        x = self.avg_pool(features)
        #print(avg_pool.size())
        x = x.view(features.size(0), -1)
        #print(flatten.size())
        x = self.classifier(x)
        #x = self.softmax(x)
        return x, features
위 코드는 VGG19 모델의 코드로 확인해보면 layer가 19개로 구성되어 있는 것을 확인 할 수 있다. Sequential을 활용하여 구현하였다. Sequential 을 이용할 경우, forward에서 각 레이어를 하나하나 부르는 대신, 해당 Sequence의 이름을 불러서 한번에 이용이 가능하다.
nn.Conv2d의 파라미터는 다음과 같다. 첫 번째 파라미터인 3은 input_channel_size로 Input image가 RGB image이기 때문에 3이다. 두 번째 파라미터인 32는 output_channel_size이다. (즉 컨볼루션 레이어를 걸쳐 몇장의 필터를 만들어내 고 싶은가? 이다. 32장의 필터를 만들어 내고 싶으므로 32가 된다.) 세 번째 파라미터 kernel_size(filter_size)이다. 말 그대로 filter의 size를 정의하는 것이다. (VGG는 3 x 3 filter를 사용하기 때문에 3이다.) 네 번째 파라미터는 padding = 1이다. padding을 줄지 말지 여부와 padding 사이즈를 지정해준다. 마지막으로 stride는 따로 주지 않지만 따로 주지 않으면 defualt값으로 1로 지정된다. (Conv2d 파라미터를 확인하고 싶으면 링크를 눌러주세요)
모델에서 pytorch는 filter의 크기에 맞춰서 적절한 패딩 값을 직접 입력해 주어야 한다. 일반적으로 패딩의 크기는 stride값을 1을 사용할때, 필터의 크기의 절반을 사용한다. 이는 필터의 크기가 절반이 되어야 모든 픽셀이 한번씩 중앙에 오게되기 때문(:=모든픽셀을 체크하는 것이 되기 때문)이다.
Pooling 연산을 사용하기 위해서는 MaxPool1d , MaxPool2d, MaxPool3d, AvgPool1d, AvgPool2d, AvgPool3d가 있다. 6가지는 차원 수와 연산방법을 제외하고는 모두 같다. 위 코드에서는 MaxPool2d와 AvgPool2d를 사용했다. (MaxPool2d 파라미터를 확인하고 싶으면 링크를 눌러주세요.) MaxPool2d의 필터 크기가 2,2이유는 반으로 줄이기 위해서 이다. AvgPool2d의 필터 크기가 7 x 7인 이유는 MaxPooling레이어를 거칠때 마다 이미지의 각 면의 길이는 절반이 된다. VGG19에서 요구하는 이미지의 크기는 244 x244이고, 122, 56, 28, 14, 7의 순서로 크기가 줄어들게 되기 때문이다.
기존 VGG19모델과 마지막에는 Average pooling을 하고 , Fully Connected Layer를 사용하여 Classificationd을 하였다. 하지만 본 코드는 FCL을 사용하지 않고 Convolution을 사용 하는 논문(Class Activation Map)의 caffe 버전을 중심구현하였다.
device = torch.device("cuda:0" if torch.cuda.is_available() else "cpu")

net = Net()
net = net.to(device)
param = list(net.parameters())
위 코드의 첫 번째 줄을 통해 device라는 변수명에 GPU디바이스를 지정/저장해준다. (Cuda, cudnn, pytorch 버전이 맞는지 확인 해주세요. 버전이 맞지 않을 경우 CPU로 학습합니다.) torch.cuda.is.available()은 GPU를 사용할 수 있는지 반환하는 메소드이다. 그 다음, net=Net()을 통해 Net을 초기화 해주고, net.to(device)구문을 통해 해당 네트워크를 GPU에서 돌아가는 네트워크로 지정한다.
import torch.optim as optim

criterion = nn.CrossEntropyLoss().cuda()
optimizer = optim.Adam(net.parameters(),lr=0.00001)

idx2label = []
cls2label = {}
with open("./data/imagenet/imagenet_class_index.json", "r") as read_file:
    class_idx = json.load(read_file)
    idx2label = [class_idx[str(k)][1] for k in range(len(class_idx))]
    cls2label = {class_idx[str(k)][0]: class_idx[str(k)][1] for k in range(len(class_idx))}
criterion 은 일반적으로 loss 라고도 부르며, 이를 통해 학습을 위한 loss값을 계산하게 된다. PyTorch에서 분류를 위해 자주 사용되는 CrossEntropyLoss의 경우 내부에서 SoftMax를 내장하고 있으므로, 모델 구조에서 SoftMax를 할 필요가 없다.(SoftMax가 없는 CrossEntropyLoss를 사용하고 싶을 경우 NLLLoss를 사용하면 된다.
Optimizer는 loss function의 결과값을 최소화하는 모델의 인자를 찾는 것으로 현재 자주 사용되는 Adam optimizer를 사용 했다. Adam은 학습 시 현재의 미분값 뿐만이 아니라, 이전 결과에 따른 관성 모멘트를 가지고 있는것이 특징이다. 이는 paddle point(안장점)에 도달하더라도 빠져나갈 수 있으므로, adam optimizer뿐만이 아니라, 현재 자주사용되는 옵티마이저들 에서는 대부분 사용되는 개념이다.
그 다음, imagenet_calss_index.json파일을 다운로드 받아 폴더에 넣어준다. 파일은 링크에서 다운로드 받을 수 있다. ImageNet은 총 100개의 class로 구성되어 있고 단순히 'cat' 'dog'가 아니라 'n01440764'와 같은 직관적으로 파악하기 어려운 index로 구분되어 있기 때문에 이를 label로 변환하는 작업이다.
VGG모델 실행하기
for epoch in range(10):  # loop over the dataset multiple times
    running_loss = 0.0

    if(epoch>0):
        net = Net()
        net.load_state_dict(torch.load(save_path))
        net.to(device)

    for i, data in enumerate(trainloader, 0):
        # get the inputs
        inputs, labels = data
        inputs, labels = inputs.to(device), labels.to(device)
        # zero the parameter gradients
        optimizer.zero_grad()
        outputs,f = net(inputs)
        loss = criterion(outputs, labels)

        loss.backward()
        optimizer.step()

        if(loss.item() > 1000):
            print(loss.item())
            for param in net.parameters():
                print(param.data)
        # print statistics
        running_loss += loss.item()
        if i % 50 == 49:    # print every 2000 mini-batches
            print('[%d, %5d] loss: %.3f' %
                  (epoch + 1, i + 1, running_loss / 50))
            running_loss = 0.0
    save_path="./data/imagenet/pth/imagenet_vgg16_result.pth"
    torch.save(net.state_dict(), save_path)
        #print("\n")

print('Finished Training')

class_correct = list(0. for i in range(1000))
class_total = list(0. for i in range(1000))
with torch.no_grad():
    for data in testloader:
        images, labels = data
        images = images.cuda()
        labels = labels.cuda()
        outputs,_ = net(images)
        _, predicted = torch.max(outputs, 1)
        c = (predicted == labels).squeeze()
        for i in range(16):
            label = labels[i]
            class_correct[label] += c[i].item()
            class_total[label] += 1

accuracy_sum=0
for i in range(1000):
    temp = 100 * class_correct[i] / class_total[i]
    print('Accuracy of %5s : %2d %%' % (
        idx2label[i], temp))
    accuracy_sum+=temp
print('Accuracy average: ', accuracy_sum/1000)
VGG모델을 실행하는 코드는 위와 같다. 필자는 테스트를 위해 epoch를 10으로 했다. epoch가 늘어 날 수록 loss는 줄어든다. 아래 이미지를 보면 1epoch일때 loss는 6.9이다. 그런데 10epoch에서는 5.8 ~ 5.9인것을 볼 수 있다. 1epoch가 실행 될때마다 net을 저장해주고 다음 epoch를 돌 때 net을 불러온다. 이는 중간에 실행을 끊더라도 다시 실행시킬 때 처음 부터 training 되는 것이 아닌, 끊은 시점부터 training되도록 하기 위함이다. training이 완료되면 accuracy를 계산하여 각 class의 정확도를 print해주고, 추가로 1000개 class의 accuracy의 평균도 계산하여 마지막에 print해준다. epoch가 상당히 낮기 때문에 정확도가 매우 안좋은 것을 볼 수 있다.


Full Code
ImageNet
import torch
import torchvision
import torchvision.transforms as transforms

import torch.optim as optim
import torch.nn as nn
import torch.nn.functional as F

import matplotlib.pyplot as plt
import numpy as np

import json
import os


transform = transforms.Compose([
    transforms.Resize((224, 224)),
    transforms.ToTensor(),
    transforms.Normalize((0.5, 0.5, 0.5), (0.5, 0.5, 0.5)),
])


trainset = torchvision.datasets.ImageNet(root='./data/imagenet', split='train', download=None, transform=transform)
trainloader = torch.utils.data.DataLoader(trainset, batch_size=64, shuffle=True)

testset = torchvision.datasets.ImageNet(root='./data/imagenet', split='val', download=None, transform=transform)
testloader = torch.utils.data.DataLoader(testset, batch_size=64, shuffle=False)


class Net(nn.Module):
    def __init__(self):
        super(Net, self).__init__()
        self.conv = nn.Sequential(
            #3 224 128
            nn.Conv2d(3, 64, 3, padding=1),nn.LeakyReLU(0.2),
            nn.Conv2d(64, 64, 3, padding=1),nn.LeakyReLU(0.2),
            nn.MaxPool2d(2, 2),
            #64 112 64
            nn.Conv2d(64, 128, 3, padding=1),nn.LeakyReLU(0.2),
            nn.Conv2d(128, 128, 3, padding=1),nn.LeakyReLU(0.2),
            nn.MaxPool2d(2, 2),
            #128 56 32
            nn.Conv2d(128, 256, 3, padding=1),nn.LeakyReLU(0.2),
            nn.Conv2d(256, 256, 3, padding=1),nn.LeakyReLU(0.2),
            nn.Conv2d(256, 256, 3, padding=1),nn.LeakyReLU(0.2),
            nn.MaxPool2d(2, 2),
            #256 28 16
            nn.Conv2d(256, 512, 3, padding=1),nn.LeakyReLU(0.2),
            nn.Conv2d(512, 512, 3, padding=1),nn.LeakyReLU(0.2),
            nn.Conv2d(512, 512, 3, padding=1),nn.LeakyReLU(0.2),
            nn.MaxPool2d(2, 2),
            #512 14 8
            nn.Conv2d(512, 512, 3, padding=1),nn.LeakyReLU(0.2),
            nn.Conv2d(512, 512, 3, padding=1),nn.LeakyReLU(0.2),
            nn.Conv2d(512, 512, 3, padding=1),nn.LeakyReLU(0.2),
            nn.MaxPool2d(2, 2)
        )
        #512 7 4

        self.avg_pool = nn.AvgPool2d(7)
        #512 1 1
        self.classifier = nn.Linear(512, 1000)
        """
        self.fc1 = nn.Linear(512*2*2,4096)
        self.fc2 = nn.Linear(4096,4096)
        self.fc3 = nn.Linear(4096,10)
        """

    def forward(self, x):

        #print(x.size())
        features = self.conv(x)
        #print(features.size())
        x = self.avg_pool(features)
        #print(avg_pool.size())
        x = x.view(features.size(0), -1)
        #print(flatten.size())
        x = self.classifier(x)
        #x = self.softmax(x)
        return x, features

device = torch.device("cuda:0" if torch.cuda.is_available() else "cpu")

print(device)

net = Net()
net = net.to(device)
param = list(net.parameters())

criterion = nn.CrossEntropyLoss().cuda()
optimizer = optim.Adam(net.parameters(),lr=0.00001)

idx2label = []
cls2label = {}
with open("./data/imagenet/imagenet_class_index.json", "r") as read_file:
    class_idx = json.load(read_file)
    idx2label = [class_idx[str(k)][1] for k in range(len(class_idx))]
    cls2label = {class_idx[str(k)][0]: class_idx[str(k)][1] for k in range(len(class_idx))}


for epoch in range(10):  # loop over the dataset multiple times
    running_loss = 0.0

    if(epoch>0):
        net = Net()
        net.load_state_dict(torch.load(save_path))
        net.to(device)

    for i, data in enumerate(trainloader, 0):
        # get the inputs
        inputs, labels = data
        inputs, labels = inputs.to(device), labels.to(device)
        # zero the parameter gradients
        optimizer.zero_grad()
        outputs,f = net(inputs)
        loss = criterion(outputs, labels)

        loss.backward()
        optimizer.step()

        if(loss.item() > 1000):
            print(loss.item())
            for param in net.parameters():
                print(param.data)
        # print statistics
        running_loss += loss.item()
        if i % 50 == 49:    # print every 2000 mini-batches
            print('[%d, %5d] loss: %.3f' %
                  (epoch + 1, i + 1, running_loss / 50))
            running_loss = 0.0
    save_path="./data/imagenet/pth/imagenet_vgg16_result.pth"
    torch.save(net.state_dict(), save_path)
    #print("\n")

print('Finished Training')

class_correct = list(0. for i in range(1000))
class_total = list(0. for i in range(1000))
with torch.no_grad():
    for data in testloader:
        images, labels = data
        images = images.cuda()
        labels = labels.cuda()
        outputs,_ = net(images)
        _, predicted = torch.max(outputs, 1)
        c = (predicted == labels).squeeze()
        for i in range(16):
            label = labels[i]
            class_correct[label] += c[i].item()
            class_total[label] += 1

accuracy_sum=0
for i in range(1000):
    temp = 100 * class_correct[i] / class_total[i]
    print('Accuracy of %5s : %2d %%' % (
        idx2label[i], temp))
    accuracy_sum+=temp
print('Accuracy average: ', accuracy_sum/1000)
STL10
import torch
import torchvision
import torchvision.transforms as transforms

import torch.nn as nn
import torch.nn.functional as F

import matplotlib.pyplot as plt
import numpy as np

import os
os.environ['KMP_DUPLICATE_LIB_OK']='True' #라이브러리 중복시 오류를 방지하기 위한 코드

transform = transforms.Compose([
    transforms.Resize(224),
    transforms.ToTensor(),
    transforms.Normalize((0.5, 0.5, 0.5), (0.5, 0.5, 0.5)),
])

trainset = torchvision.datasets.STL10(root='./data', split='train', download=True, transform=transform)
trainloader = torch.utils.data.DataLoader(trainset, batch_size=64, shuffle=True)

testset = torchvision.datasets.STL10(root='./data', split='test', download=True, transform=transform)
testloader = torch.utils.data.DataLoader(testset, batch_size=64, shuffle=False)


class Net(nn.Module):
    def __init__(self):
        super(Net, self).__init__()
        self.conv = nn.Sequential(
            #3 224 128
            nn.Conv2d(3, 64, 3, padding=1),nn.LeakyReLU(0.2),
            nn.Conv2d(64, 64, 3, padding=1),nn.LeakyReLU(0.2),
            nn.MaxPool2d(2, 2),
            #64 112 64
            nn.Conv2d(64, 128, 3, padding=1),nn.LeakyReLU(0.2),
            nn.Conv2d(128, 128, 3, padding=1),nn.LeakyReLU(0.2),
            nn.MaxPool2d(2, 2),
            #128 56 32
            nn.Conv2d(128, 256, 3, padding=1),nn.LeakyReLU(0.2),
            nn.Conv2d(256, 256, 3, padding=1),nn.LeakyReLU(0.2),
            nn.Conv2d(256, 256, 3, padding=1),nn.LeakyReLU(0.2),
            nn.MaxPool2d(2, 2),
            #256 28 16
            nn.Conv2d(256, 512, 3, padding=1),nn.LeakyReLU(0.2),
            nn.Conv2d(512, 512, 3, padding=1),nn.LeakyReLU(0.2),
            nn.Conv2d(512, 512, 3, padding=1),nn.LeakyReLU(0.2),
            nn.MaxPool2d(2, 2),
            #512 14 8
            nn.Conv2d(512, 512, 3, padding=1),nn.LeakyReLU(0.2),
            nn.Conv2d(512, 512, 3, padding=1),nn.LeakyReLU(0.2),
            nn.Conv2d(512, 512, 3, padding=1),nn.LeakyReLU(0.2),
            nn.MaxPool2d(2, 2)
        )
        #512 7 4

        self.avg_pool = nn.AvgPool2d(7)
        #512 1 1
        self.classifier = nn.Linear(512, 10)
        """
        self.fc1 = nn.Linear(512*2*2,4096)
        self.fc2 = nn.Linear(4096,4096)
        self.fc3 = nn.Linear(4096,10)
        """

    def forward(self, x):

        #print(x.size())
        features = self.conv(x)
        #print(features.size())
        x = self.avg_pool(features)
        #print(avg_pool.size())
        x = x.view(features.size(0), -1)
        #print(flatten.size())
        x = self.classifier(x)
        #x = self.softmax(x)
        return x, features

device = torch.device("cuda:0" if torch.cuda.is_available() else "cpu")

print(device)

net = Net()
net = net.to(device)
param = list(net.parameters())

classes =  ('airplance', 'bird', 'car', 'cat', 'deer', 'dog', 'horse', 'monkey', 'ship', 'truck')
import torch.optim as optim

criterion = nn.CrossEntropyLoss().cuda()
optimizer = optim.Adam(net.parameters(),lr=0.00001)

for epoch in range(100):  # loop over the dataset multiple times
    running_loss = 0.0
    for i, data in enumerate(trainloader, 0):
        # get the inputs
        inputs, labels = data
        inputs, labels = inputs.to(device), labels.to(device)
        optimizer.zero_grad()
        outputs,f = net(inputs)
        loss = criterion(outputs, labels)
        loss.backward()
        optimizer.step()

        if(loss.item() > 1000):
            print(loss.item())
            for param in net.parameters():
                print(param.data)
        # print statistics
        running_loss += loss.item()
        if i % 50 == 49:    # print every 2000 mini-batches
            print('[%d, %5d] loss: %.3f' %
                  (epoch + 1, i + 1, running_loss / 50))
            running_loss = 0.0
    save_path="./data/stl10_binary/pth/Vgg19.pt"
    torch.save(net, save_path)

print('Finished Training')

class_correct = list(0. for i in range(10))
class_total = list(0. for i in range(10))
with torch.no_grad():
    for data in testloader:
        images, labels = data
        images = images.cuda()
        labels = labels.cuda()
        outputs,_ = net(images)
        _, predicted = torch.max(outputs, 1)
        c = (predicted == labels).squeeze()
        for i in range(4):
            label = labels[i]
            class_correct[label] += c[i].item()
            class_total[label] += 1


for i in range(10):
    print('Accuracy of %5s : %2d %%' % (
        classes[i], 100 * class_correct[i] / class_total[i]))
참고자료
Pytorch로 CNN 구현하기
CNN In Pytorch Pytorch에는 CNN을 개발 하기 위한 API들이 있습니다. 다채널로 구현 되어 있는 CNN 신경망을 위한 Layers, Max pooling, Avg pooling 등, 이번 시간에는 여러 가지 CNN을 위한 API를 알아 보겠습니다.
justkode.kr
VGG16 논문 리뷰 — Very Deep Convolutional Networks for Large-Scale Image Recognition
VGG-16 모델은 ImageNet Challenge에서 Top-5 테스트 정확도를 92.7% 달성하면서 2014년 컴퓨터 비전을 위한 딥러닝 관련 대표적 연구 중 하나로 자리매김하였다.
medium.com
VGG Net 과 CAM 구현 - POD_Deep-Learning
VGG Net 과 CAM 구현 Initial import torch import torchvision import torchvision.transforms as transforms torch libary init torch.cuda.is_available() torch.cuda.is_available 값이 True 면, 현재 GPU를 사용한 학습이 가능하다는 뜻, False
poddeeplearning.readthedocs.io
[pytorch] VGGNet으로 ImageNet 학습하기
1. VGGNet이란? CNN 알고리즘들 중에서는 이미지 분류(Image Classification)용 알고리즘, 예를 들어 AlexNet, GoogleNet 등이 있다. 그 이미지 분류 CNN 모델들 중에 하나가 바로 VGGNet이다. VGGNet은 몇 개의..
minjoos.tistory.com

